How to use the ChessKid Live Classroom tool
The Live Classroom tool is a way to host a real-time lesson for your students directly within ChessKid.
ChessKid is excited to bring you a Beta version of this new feature - try it out for your online lessons & tournament preparation.
You no longer need to use a 3rd party video hosting service for your online lessons! In the Live Classroom, you can host a remote classroom environment using real-time audio and video to teach. By not needing to leave the site, you have:
- Direct access to your saved ChessKid games and positions
- Direct access to your Kids' game histories
- The ability to give students control of the board during the lesson
- All the safety features of ChessKid
In this How-to Guide, you'll find steps to:
- Set up a Classroom
- Invite Kids to your Classroom
- Give board and audio control to Kids
- Time your lesson
- Using audio
- Using video
- Board controls
- Arrows, highlighting squares, and game analysis views
- FAQ
- Coach Dakim's Teaching Tips for hosting a successful online lesson
All Parent, Teacher, and Coach accounts have access to the Live Classroom tool.
Step 1: Set up a new Classroom
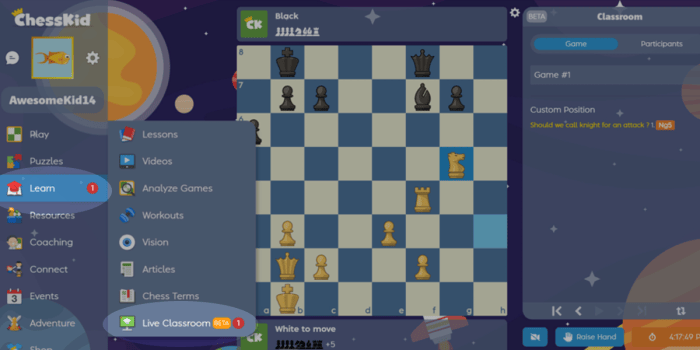
- From your Home page, select the Live Classroom option from the top "Teach" dropdown menu.
- Click the orange "New Room" button. This creates your Classroom session.
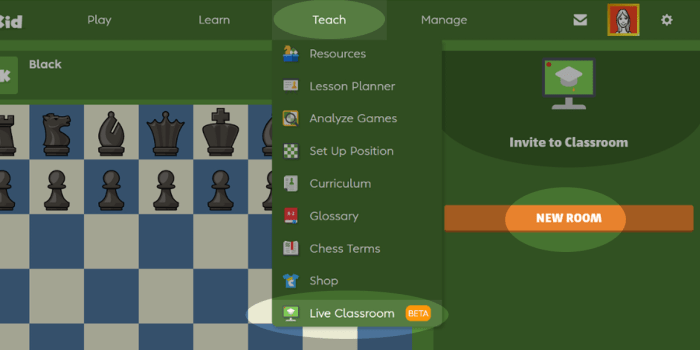
- Before starting a lesson, set up the board by either loading a game, saved position, or making moves on the board. You'll then be able to invite your students to the Classroom.
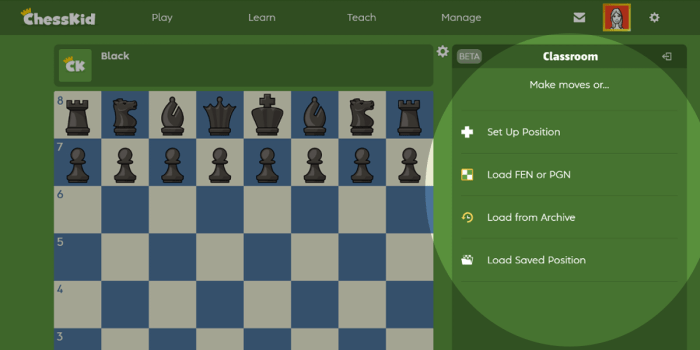
- Use the chessboard like a regular analysis board: Arrow through the moves of the game or position, make moves to start a variation, or flip the board.
- You can create & save multiple boards: click the "Boards" link, then choose "New Board."
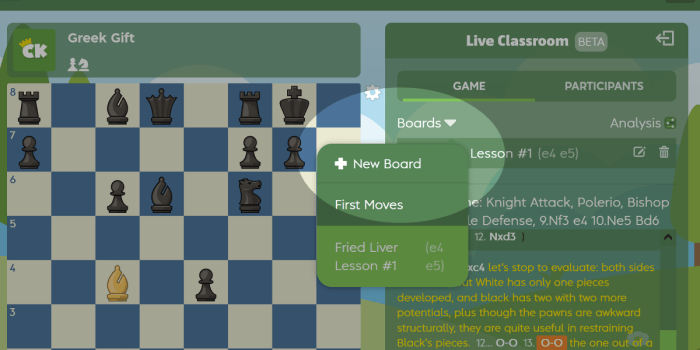
- **Teaching tip: Save preloaded instructional games, positions, or puzzles in advance for that day's lesson. This way, you'll be able to quickly switch out your examples during the live session.
Step 2: Invite Kids to your Classroom
- Kids you invite to your Classroom need to be under your Guardianship (or in one of your Groups if you have an Enterprise account). Only Kid-type accounts can be invited to your Classroom.
- To invite Kids, click on the "Participants" tab at the top of the Classroom menu, then click the orange "Invite" button. You can select students from your Kids list, search for individual Kids, or view the members of your Clubs and Groups. Click the checkbox next to their usernames and click "Done" at the bottom to send an invitation.
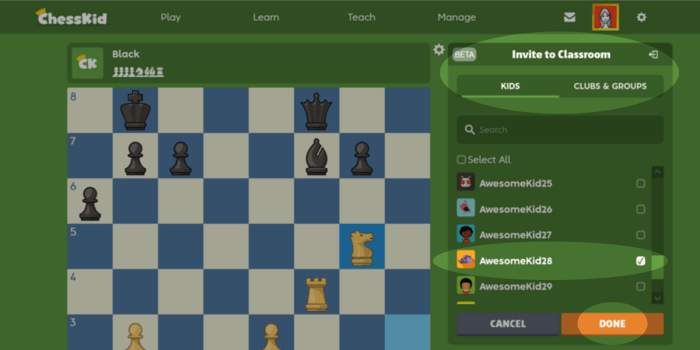
- Once a Kid has been invited, they'll be taken directly into your Classroom (or if they're in another activity on the site, they'll see an alert on the left menu of their ChessKid Home page where they can click the Classroom link and join your session). Let your students know the day and time of your lesson and have them look for the link on their ChessKid Home page menu.
- Your Classroom has a unique Room ID that Kids can use to enter the room if prompted. You can copy this ID from the top of the Participants tab. (You can also copy and paste the entire URL of your Classroom.)
Step 3: Using the Live Classroom features during a lesson
The Classroom has features that the session host can use to instruct during the lesson.
Giving chessboard control and audio access to individual Kids:
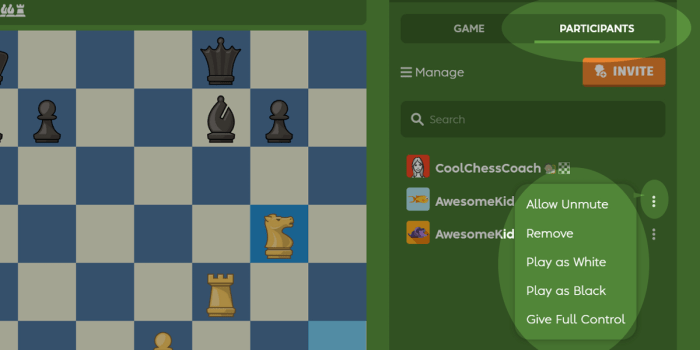
- From your Classroom's Participant list, you'll find icons next to each student's username to: 1) Allow them to move as White, 2) Allow them to move as Black, 3) Give them full control of the chessboard, and 4) Unmute or Mute their microphone.
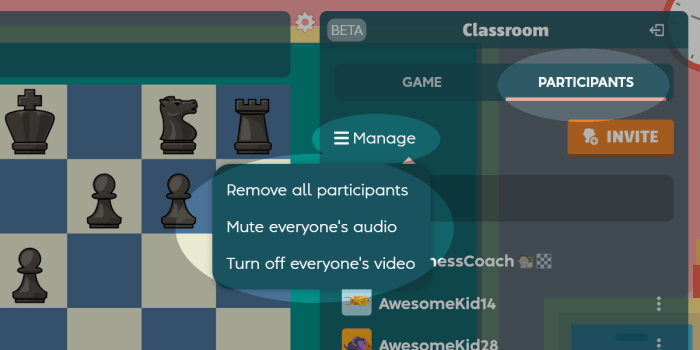
- The host has total control over a Classroom session. You can quickly: 1) Remove all participants, 2) Mute all audio, or 3) Turn off everyone's video from the "Manage" menu on the Participants tab.
Timing your lesson:
- You can toggle between several timing options for your Classroom from the orange clock at the bottom of the Classroom window.
- You can choose to: 1) View the current clock time, 2) View how long your Classroom has been taking place, 3) Set a timer, or 4) Start a stopwatch.
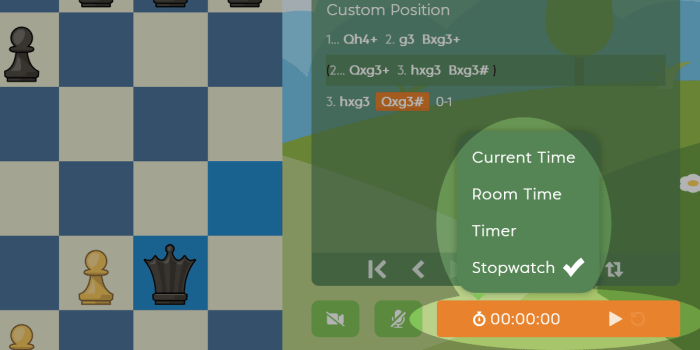
- **Teaching Tip: Use the stopwatch or timer functions during your lesson to time a puzzle solution, or give the class a certain amount of time to come up with an answer!
Using audio:
- The Classroom session will begin with no audio enabled.
- The host can toggle their own audio on or off by clicking the green "Audio" icon at the bottom of the Classroom window.
- The host must enable the audio for any individual Kid to be able to turn on their microphone. Click the "Allow Unmute" option from the menu next to the Kid's username from the Participant list. The Kid must then unmute their microphone from the bottom of the Classroom window.
- Each Kid has the ability to raise (and un-raise) their hand from the bottom of their Classroom window.
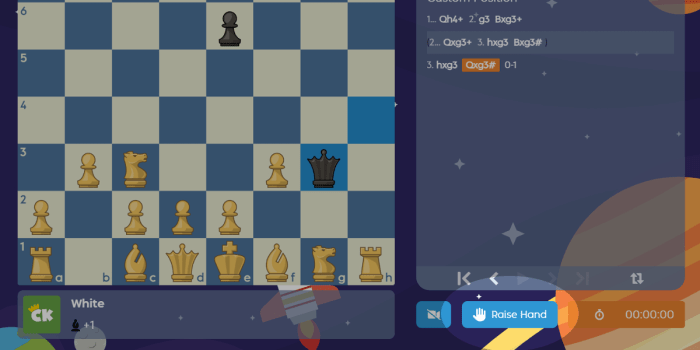
- The host will automatically see a Kid's raised hand for 20 seconds, or Kids have the option to put their hand down from their own page.
Using video:
- The Classroom session will begin with no video cameras on.
- The host and each participant have the option to enable their own video camera. Click the green "Video" icon at the bottom of the Classroom window to toggle your own video on or off.
- Participants can re-order the video view by clicking and dragging the video windows on the right side.
Using board controls:
- The Classroom session will begin with only the host having control of the chessboard.
- The host can give chessboard control to individual students using the menu options next to each Kid's username from the Participant list.
- Select "Play as White" to give the ability to move as White.
- Select "Play as Black" to give the ability to move as Black.
- Select "Give Full Control" to give the ability to have full chessboard control.
- Select "Remove Control" to turn off any board control.
Using arrows, highlighting squares, and game analysis options:
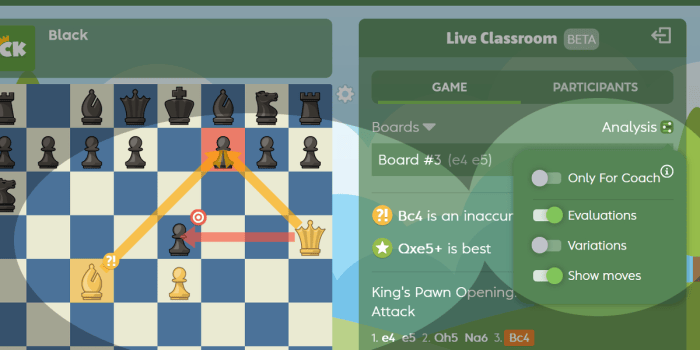
- Right-click and drag a piece to draw arrows.
- Right-click a square to highlight it.
- The board has analysis features that can be displayed to the entire Classroom, or just to the host. Find them in the right-side Analysis dropdown menu.
Exiting the Live Classroom:
- The Classroom session you've set up will stay active until you close it.
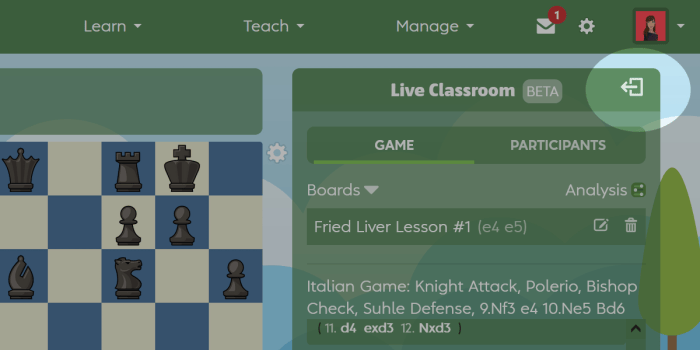
- Exit and close a Classroom session by clicking the "Exit" icon at the top right of your Classroom window. This will end the Classroom session.
Troubleshooting & FAQ:
How do my students join my Classroom?
- After the host sends an invitation to one of their Kids, the Kid will see a red alert on the "Live Classroom" link from the left side of their Home page.
- Your Classroom also has a unique Room ID which Kids can use to enter the room if prompted. You can copy this ID from the top of the Participants tab. (You can also copy and paste the entire URL of your Classroom.)
Can my Kids join from the ChessKid app?
- No. At this time, Kids must join your Classroom using a browser.
When inviting Kids, what does it mean if the system says my Kid is "busy"?
- This means that the Kid is either offline or on a different page within ChessKid.
How many students can be in my Classroom at the same time?
- Your Classroom can have up to 50 participants at one time.
My video isn't working.
- Be sure that the participant has selected the device setting option allowing their device to access the camera and microphone. Make sure that the device is toggled to the default audio/video options if using an external webcam or microphone.
I can't find my Kid, they're not showing up in the list of Kids I can invite.
- Make sure that you have Guardianship of the Kid account you'd like to join your Classroom. You'll need to be either a Primary Guardian, Additional Guardian, or have them as a Kid in one of your Enterprise Groups.
As the host, I accidentally clicked on a different page within ChessKid while my Classroom was taking place. How do I get back in?
- The host can navigate back into the Classroom by finding the active session from their main Home/Teach menu. A red alert will show that there's an active Classroom still taking place.
- Kids will be removed from a Classroom with no host after 5 minutes, but can be re-invited.
How do I disable everyone's video?
- From the Participants tab, choose "Turn off everyone's video" from the dropdown Manage menu.
How do I remove all participants from a Classroom?
- From the Participants tab, choose "Remove all participants" from the dropdown Manage menu.
How do I know if a Kid has a question?
- Each Kid has the ability to raise their hand next to their own username on the Participant list. The host will automatically see a Kid's raised hand for 20 seconds, or Kids have the option to put their hand down from their own list.
Coach Dakim's Tips for Hosting a Successful Online Lesson
Whether it's a snow day, an out-of-town student, a pre-tournament warm-up session, or you just teach students virtually, the ChessKid Live Classroom is a great way to host your lessons!
The key to a successful online Classroom: Prepare in advance!
1) Structure your lesson:
- Plan a lesson to last about 15-30 minutes.
- Choose a main topic for each lesson, for example: "Rooks on the 7th rank," "Using the Bishop Pair," or "Opposition in Endgames."
- Build in time for kids to independently think and problem-solve. Consider the levels of your group and plan accordingly.
- Include easy, medium, and difficult questions to target each level of students in your Classroom.
- Know your students: You may want to target some students with extra lesson time when everyone else is allowed to play.
The more prepared you are before the lesson the easier it will be to run!
2) Get set up in advance:
- Set up a ChessKid Club (or Enterprise Group) in advance. You can invite all the members of a Club or Group to your Classroom session at one time.
- Create specific Clubs for each lesson: Tournament players, under 1000 players, after-school clubs, or special interest groups like an all-girls or all-stars club.
- Use the Analysis Board tool to load FEN and PGN positions in advance. This will save time not having to set up each position during the lesson.
- With the ”Set up position” feature you can set up positions ahead of time or “load saved positions” to use the same lessons for multiple groups at a time. You can re-name the boards once they've been loaded in your Classroom.
- Set behavioral expectations. Kids' microphones will be muted and all cameras begin off. Let students know how to raise their (virtual) hand to answer a puzzle or ask a question and explain how you will decide when kids can unmute.
3) Suggested activities/Planning time:
- Setting up a mini-game with the “Set up position” feature.
- Give kids control of the screen to solve the created game or puzzle.
- Lesson instruction should be no more than 30 minutes, after which kids should try out what they learned through playing.